I've discovered a fun new way to fuel my passion with handmade crafts. Recycled Christmas ornaments!
No, not antique, re-gifted or one-man's-trash-is-another-man's-treasure "Hey look what I found in the dumpster!" sort of recylced.
But a way to find NEW uses for those things that seemed to have fulfilled their only purpose.
For the past few years those things have been light bulbs and baby food jars.
(I can't believe I haven't blogged about these before, as least I don't think I have as I can't seem to find the pages ANYWHERE but if I am repeating myself forgive me for I know not what I do. Having babies makes your brains fall out.)
(Back to the ornaments!)
They're fun, easy and best of all CHEAP & oh-so GREEN!
The internetz is full of ideas and patterns. With a little searching you're sure to find a project you can do, or become inspired to make up one of your own.
PAY ATTENTION 'cuz I am about to divulge all of my secrets to you.
Last year, inspired by my daughter's love of all things
Mumble, I made this Penguin ornament:

I adapted and simplified the pattern from several other penguin light bulb ornaments I found online. The only materials needed were the paints and toddler socks which were used for the hats. (Trimmed, cuffed over and hot glued into place then tied off with the silver rope ribbing.) I make and give ornaments as gifts every year to family and friends, and since socks come in so many different colors, each of these little guys was able to get his own color/patterned hat!
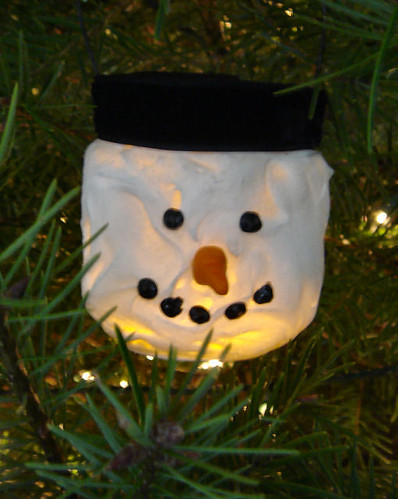
The year before I had an infant who was making her way into solid foods. I had baby food coming out of my EARS! Literally and figuratively. So I found a way to re-use the jars and made these tealight ornaments:

I made this one up as I went along. Basic instructions can be found at the bottom of this post. Oh yeah, and I still have BOXES of these jars stored in my sunroom thanks to donations from the Moms in my daughter's playgroup so... yeah, there WILL be more baby food jar ornaments for years to come.
And this is the bugger that started it all, in 2004.

Instructions for
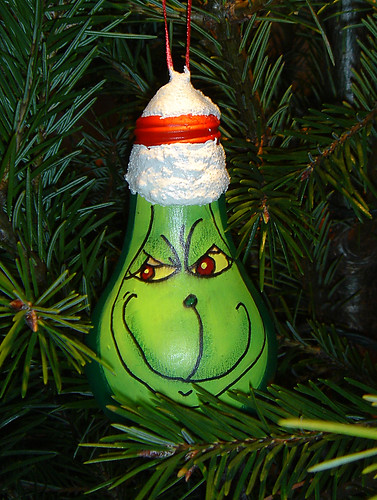
The Grinch light bulb ornament can be found here. All I have to say about this is THANK GAWD for tracing paper! This was the most involved of all the paint jobs I have ever done. But totally worth it.
Baby Food Jar Snowman Ornament/Tea Light Holder
Start with a clean stage 1 baby food far (label removed).
Cover it with the paint-on snow. Apply it thick and sloppy to give it texture.
Let dry overnight.
Meanwhile... make little carrot noses out of orange molding clay (bake according to package directions).
Next day, use black dimensional fabric paint to dot on eyes and mouth and use a dab of hot-glue to attach the nose.
Wrap soldering wire around top of the jar and bend into hanger.
Hot glue black velvet ribbon around the top.
Drop in a battery-operated tea light. Hang on tree, place on your mantel or shelf and enjoy! We always put ours on tree first, then keep it out as Winter decoration once the tree is tossed.
(Note: We tried using a real tea light but the wire hanger gets VERY hot.)
Who says it's not easy being green?
As for this year, you'll just have to wait and see.
(Mostly because I have no idea what I will be making yet.)